Wednesday, November 4, 2015

How to create images online for free?

This was a research done to integrate a shape drawing tool to our application TestBudha. Where, we wanted the user to draw an image and insert it as part of the content (which is text). But, we couldn’t find a tool which will help us achieve this. Never the less, this is what we have learn’t. Please feel free to add your comments and suggestions.

In this blog I will share few tools you can use to create an image online, but the challenge is that none of these tools help you to embed the image back to your web application dynamically.

Now, if you are a person who wants to go online for everything (well now a days everyone wants to do things online), you will have had a need to create an image online but didn’t find the right set of tools to do it. Well, this blog post is just for you.
Creating online images can vary from creating simple shapes and text to creating a painting online.

To create shapes and modify them we would need an editor which can offer a whole range of options from drawing the shape to resizing or rotating or clipping or fill colours.

If you want to draw online for example, paint a picture or teach online, we will need a plain canvas area where we can draw using the mouse or a touch device.

Let’s start with the simplest way of creating an image.

If you are looking at using an already existing solutions to create your image. You can use the following.

  1. Draw Island


Draw island comes with simple and easy to use user interface, creating shapes quickly shouldn’t be a problem. But, this tool comes with limitations. You cannot edit the shape after it is drawn which is a let down. If a simple solution is what you are looking for then this should be enough.

Once you are done creating your masterpiece, hit save to download it as .png file.

There are other tools in the market that do the same and looks better.

  1. SVG-edit


This tool is better than Draw Island because it gives you more control over the shapes you are drawing. That’s because you are working with SVG (Scalable Vector Graphics). As the name suggests these are vectors and if anyone has worked with vectors before(in applications such as Adobe Illustrator or CorelDraw) you’ll know that they scale very well. Unlike a canvas (which is provided by Draw Island) SVGs are more powerful and gives you more control over the shapes. Hence, Draw Island only provides option to add shapes and erase them, but no option to edit shapes. You can also download your creation as .png and add it to your content.


As I said, none of these satisfied our requirement.

If you guys know or have a solution to our problem please comment.

Wednesday, October 28, 2015

I am a student, how do I use Testbudha to take online test?


Hi,
This post will help you to learn how you can use TestBudha as an exam taker. In case, you are trying to log in to TestBudha to take a test, you should go here and click on “Exam Taker” button on the top right. If you are an exam administrator learning how to use TestBudha to create and administer tests, then you should go here.


Taking exams in TestBudha-Online test creation and skill assessment software is easy and fun. More importantly, it provides you capabilities to track unanswered questions and mark questions for later review. TestBudha also has an option to provide a time limit for the exam. So we do recommend you to verify it before you start the exam. The posts below walks you through some of the critical features in TestBudha. As always, write to us at enquiry@testbudha.com if you have any questions.


1. How do you register as a student in TestBudha

2. How do you take an online test in TestBudha

3. How do you view the reports after taking the test in TestBudha

4. How do you add money to the wallet in TestBudha

5. How do you purchase a test from TestBudha Market

Happy online testing with TestBudha

I am a student, how do I view the reports of my online test in TestBudha?


Viewing an online test results in the right way is equally important as taking online test. TestBudha allows its users to view their reports in a much effective way by highlighting their strong and weak areas and help them improve. 


Not just online test creation, but also analysis of students' performance are captured in TestBudha. To view this report:
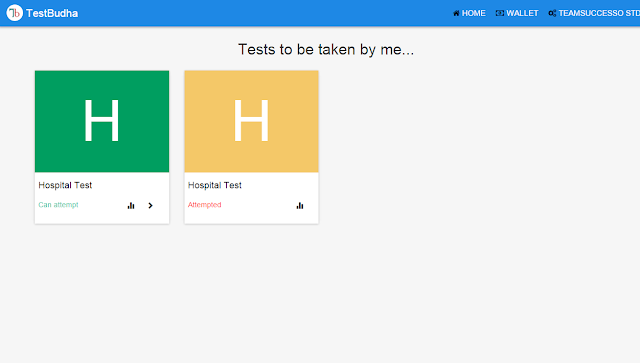
Click the graph icon on the test invitation tile. 

 
In the pop-up, score, result and detailed report will be displayed


View the detailed report by clicking on the detailed report icon.


How do you register as a student in TestBudha – Online Test Management Tool


To take an exam in TestBudha, you should receive an invitation first from a Test administrator. The mail will contain the link to log in to take the test. But if you are using TestBudha for the first time, you will have to register first. Please follow the following steps to register to TestBudha.


1. Click on Test taker button on the top right corner of TestBudha home page


    2. Click on Signup on TestBudha student home page

3. Provide all the required information and click on signup


4. Open your registered mail account and click on Activate


5. Student account activated successfully message will be displayed


How do you take an online test in Testbudha– Online Test Management Tool

     To take exam in TestBudha, You should first register as a student. If you haven't registered, follow the steps mentioned here. Once you register, you can follow the steps mentioned below to take an online test.
      1. Login as a student and click on the test 


      2. Click on submit button to continue taking the test


      3. Click on start test to start taking the test


      4. Answer all the questions and submit the test


      5. The Scorecard will be displayed after successful completion of the test


I am a test creator, how do I use Testbudha to create online test?


Hi there,

I am writing this blog to throw some light on how you can use TestBudha to create online test, online quiz and online skill assessment test.

If you are a test creator, you can click on this link to register with TestBudha and start creating online tests in minutes. TestBudha will help you create multiple choice question, short answers and descriptive/essay type. TestBudha also supports multimedia which includes audio, video and picture to be a part of your online test. 

You can invite your test takers by sending an email and configure your tests with passing marks, start date, test duration, sending reports to test taker and expiration date. Now you can restrict your test takers from taking the test multiple times and switching the exam page to a new window. 

TestBudha will automatically evaluate all your tests in minutes with its highly effective inbuilt analytic except essay type questions. View the reports of your test takers with abundant data and graphs to support and find out the strong and weak areas of your test taker. 

Now you are set to go! Happy online testing with TestBudha! 

Please write to us at enquiry@testbudha.com in case of any queries or concerns.


1. How do you create an online test in Testbudha

2. How do you invite test takers to take the test in Testbudha

3. How do you configure online test in Testbudha

4. How do you take an online test in Testbudha

5. How do you evaluate a test in Testbudha

6. How do you view a report in Testbudha


Tuesday, October 27, 2015

How do you add money to your TestBudha Wallet Account– Online Test Management Tool

 Some exams in TestBudha require you to purchase it to allow you to take it. Purchasing an exam in TestBudha is simple and straight forward. TestBudha supports both PayPal and Citrus Payment Gateways to purchase exam online.

1. Login as a student and Click on wallet to add a money to your wallet account


2. In the wallet popup, Click on Add money


3. Enter the amount to recharge your student wallet account to purchase the test


4. Click on OK to check out with your PayPal or default payment gateway.


5. Click on checkout with PayPal and provide your PayPal credentials to recharge your wallet


 6. Once the payment has made successful, it will automatically redirected to TestBudha student home page